Frostbite Ridge
Our attempt to summit Glacier Peak via Frostbite Ridge in two and a half days during late-season conditions might have been fool-hardy, but it was ultimately a successful and rewarding trek. The biggest challenge on this route was not the mileage or the elevation gain, but the unexpected conditions (AKA lack of remaining snowpack!) on the mountain. This route was a mix of pleasant and cruiser Pacific Crest Trail hiking, tickling ridge walking, pumice dust scrambling, snow bridge balancing, loose rock climbing, and the last 200 feet of glorious AI 2 ice climbing to the summit. Over the course of this climb, we traveled through alpine meadows, dense forests, rocky ridges, and ghastly glaciers, enjoying some of the most scenic and diverse views in the state.
The Details:
Time to complete: 2 ½ days (~ 60 hours)
Mileage: ~ 45 mi
Elevation Gain: ~ 8,300 feet (2.5 kilometers)
Difficulty: Grade II
Party size: 3
The Plan:
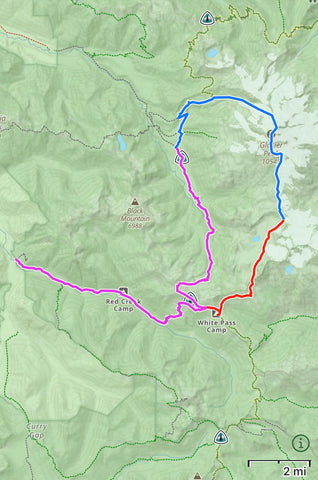
Day One: Starting at the North Fork Sauk Trailhead, hike about 17 miles to the Kennedy Hot Springs basin following the North Fork Sauk Trail for about eight and a half miles, then the north Pacific Crest Trail for another eight and a half over Red Pass and into the basin. Bivy on night one.
Day Two: An early morning start to hike the north PCT to Glacier Creek. Follow climber’s trail east paralleling the ridge and to the Kennedy Glacier. Traverse the glacier to the ridge. Climb the ridge to the “Bunny Ears,” then descend onto the high Chocolate Glacier. Complete AI 2 section to the summit, then descend via the south-side Cool and Suiattle Glaciers about three and a half miles to Glacier Gap bivy sites. Bivy on night two.
Day Three: From Glacier Gap, hike about four miles to White Pass, then join with the north PCT. Hike the north PCT until it meets the North Fork Sauk Trail and take that about eight and a half miles to the North Fork Sauk Trailhead. If back to car early enough, get burgers at the Burger Barn in Darrington.
What Actually Happened:
Day One: We left Bellingham around noon due to half-days at work and started hiking from the North Fork Sauk Trailhead at approximately 3:30pm on Friday. The first five miles of the North Fork Sauk Trail is pleasant, soft, trail hiking through thick, old-growth cedars. It follows the North Sauk River with water access at the Mackinaw Shelter about five miles in. We began with about two liters of water each in an attempt to pack lightly, prepared to filter water along the way. I suggest filling up at the shelter because the next few miles involve exposed and steep switchbacks. Depending on weather conditions, this part can be very hot due to avalanches wiping out the tree cover in the winter.
There are about three and a half miles of switchbacks from the Mackinaw Shelter to the junction of the North Fork Sauk Trail and the PCT. The trail gets a bick rockier, but it’s still easy to hike up. When meeting the PCT, head northwest towards Red Pass. Enjoy the views here! Before reaching the pass, the trail follows an alpine meadow hillside with great views of Sloan Peak and Mount Pugh. As we were hiking around dusk, we were able to enjoy the day’s last hours of sun before cresting over the horizon.

The trail crosses over Red Pass about a mile and a half after the North Sauk Trail junction. Here, the terrain drastically changes into a rocky high alpine basin. Low-hanging clouds blanketed the valley, hiding what would otherwise be a stellar view of Glacier Peak.
We decided to bivy about five miles before our day one objective due to the lateness and our exhaustion. We set up our bivy near a small creek just below the White Chuck Cinder Cone. In an attempt to keep our packs light, we didn’t bring a tent and instead searched around for a site that was flat, not rocky, and not marshy. It took a bit of time to find the perfect spot, but we eventually did. After eating a quick meal, we squeezed into our sleeping bags and tried not to think about the long day ahead of us.
A small note for this site: there are lots of mice out and about! Be sure to keep your food secured in your bag, and try your best to sleep away from rocks they might be nesting under.
Day Two: We woke up around 4:30 am, ate a quick breakfast, and watched the sunrise pull the Glacier Peak summit out of the clouds. We hiked down the basin, continuing on the north PCT into another thick forest. We lost a couple thousand feet on the descent into the valley, following the White Chuck River. Gradual switchbacks and a relatively flat trail after crossing the White Chuck River made this six miles go by fast. There is plenty of water access during this part of the hike as well.
Although the PCT was generally an easy trail to follow, there were a few places where it narrowed into tall undergrowth, and one instance where it disappeared almost completely into the Kennedy Creek crossing about four miles in. Don’t be fooled by traveling up the riverside! There isn’t an obvious place to cross the river when you meet it, but there are a few narrow log crossings if you stay lower, and the trail begins again on an unobvious gravel bankside. Depending on the time of day, the water may be moving fast here.

The next, much smaller creek crossing at Glacier Creek is the important one. To follow the ridge proper, continue on the PCT just after Glacier Creek to a “small but obvious” trail that ascends the ridge. We opted for the shortcut at the Glacier Creek crossing that follows the Kennedy Glacier to the ridge. The climber’s trail from Glacier Creek is basically non-existent and scrambles up loose dirt to the old moraine of the Kennedy Glacier. Keep in mind this is the last time a proper trail will exist until the summit.
Accessing the Kennedy Glacier in mid-August proved tricky. A bit of rock and creek scrambling eventually pops you onto the snow. The low glacier was riddled with fractures and seracs that were difficult to weave between. Eventually we resorted to a short ice-climb along an ice fin that popped us onto a higher part of the glacier. Assuming we would have cruiser low-angle snow travel until meeting the ridge, our hopes soared on the climb itself. But as soon as we climbed on top, we realized that wasn’t the case.
The upper Kennedy Glacier was a mazed mess of 5-15 foot crevasses that striped like stretch marks across the glacier. Moving slowly, we were able to puzzle our way more than halfway to our ridge goal: an obvious scramble would cut off about a mile of the ridge proper. However, our efforts became more futile the further east we attempted to travel. In midday sun, we decided to play it safe and backtrack north to the ridge proper.

Tired and defeated, we finally made it to the ridge just east of Kennedy Peak. After removing our crampons, we set out on the south east scramble. Between blocks of semi-stable volcanic rock was loose pumice choss that skittered away with every step we made. By the time we made it to the base of the last push to the Bunny Ears, we were too tired to go on. It was about 6pm, and we knew our goal of summiting and making it to Glacier Gap was unrealistic. Even a summit bivy felt impossible.
After finding the wind-shelter skeletons of old bivy sites, we decided to call it quits for the day at about 9,000 feet of elevation. There was a small ice-melt water source just a few hundred feet down from our site that proved good enough for the night. We filled up all of our water containers knowing it would be too frozen to fill back up again tomorrow.
As the sun set, the wind rose. After eating a small, silent dinner, we gathered stones to fortify the wind-shelter we settled on. Despite our efforts, the wind whipped all night, coating our belongings and bodies in dust. As the sun set, I couldn’t help but feel a stone in my stomach as I stared up at the final scramble to the Bunny Ears. That night, getting no sleep wasn’t an option; we did our best to rest before the daunting third day ahead of us.

Day Three: I should note here that unless you plan on downclimbing the same Frostbite Ridge Route, there is no turning back once you hit the ridge. That was the feeling in my gut as I watched the morning sun highlight the remainder of our route.
We woke up around 4am on day three to the unceasing wind and decided to wait to see if the rising sun would damper them at all. Around 5:15, we stirred and started to pull our boots on. The wind hadn’t let up.
The “route” up to the Bunny Ears is essentially dust scrambling with a few large, loose blocks to maneuver. Near the start of the scramble, there are some precariously narrow, exposed, and dusty ridge steps that require focus and balance to cross. It’s also important to know that specifically on this part of the climb, even the largest and most stable-looking boulders can’t be trusted. At one point, I sent a microwave-sized rock tumbling down onto the vista below. Cutting switchbacks through the dust is somewhat effective, but it’s oftentimes quicker to simply climb upwards.

Just below an obvious rock outcropping about halfway up, the rock gets slightly more stable. We were able to pop back into some steep snow at the base of the outcropping and climb to the top of the ridge. We simul climbed this part using screws and pickets for protection. We took off our crampons at the top and prepared for the down climb. The top of the ridge is at 10,200 feet of elevation, but there is a third-class down climb that took us back down to 10,000 ft.
After the down climb, we followed the ridge to another third class scramble, though don’t be fooled, there were definitely some fourth-class moves made on this part. At one point, I heel hooked a rock flake over a chilling drop-off.

After the climb back up, there was a relatively mellow hike to the top of a short rappel to get back onto the glacier. The end of this section was easy to down climb if your rope isn’t long enough. Once we were back on the glacier, we took advantage of the ice melt to fill our waters. Note that this is the only water source we encountered after our bivy. Though less than a mile away from our bivy site, it took immense exertion and time to get there.
Then, we’d finally reached the part we’d come all the way for: the 200 feet of AI 1-2 climbing. This part was relatively straightforward and we were able to finish it in two simul blocks, using ice screws for protection. The late morning sun softened up what would otherwise be pure ice.

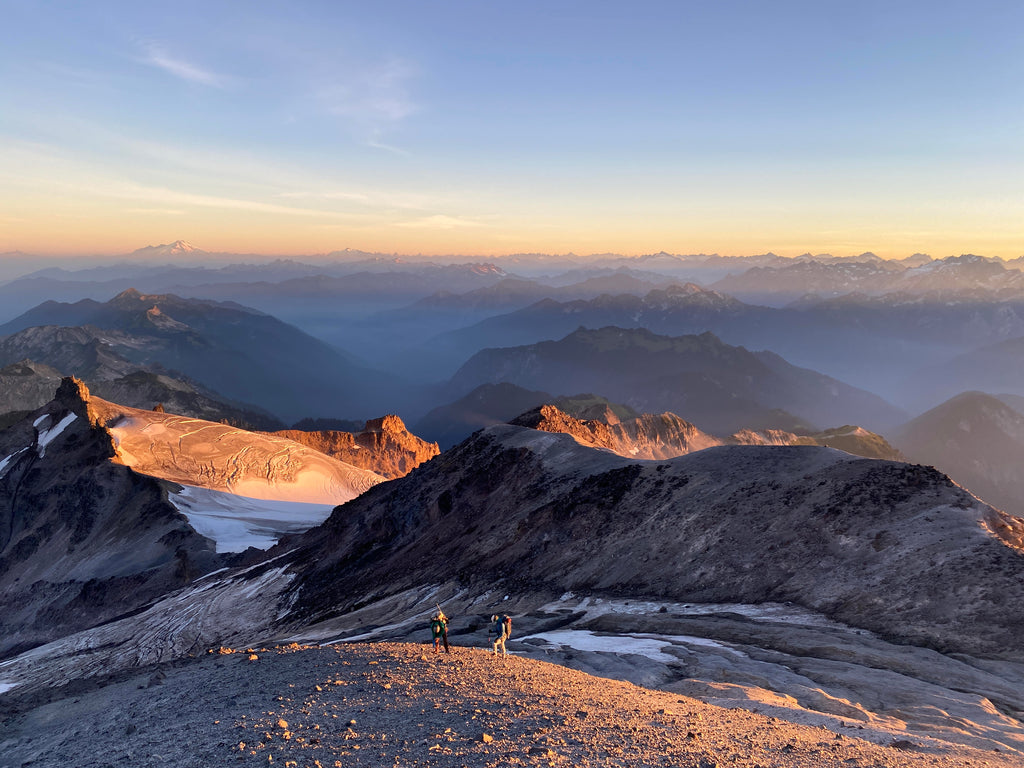
After the climb, we’d reached the summit! At just before 11 am, the sun was high and warm. Of course, there were spectacular views of Mount Baker and Mount Rainier at the top. We stopped long enough to have lunch, then began our descent.
From the summit on, the trail was quite clear as we were back on the more popular route. After a down climb, we put our crampons back on to descend the Suiattle Glacier. Here, snowmelt was equally more drastic than we anticipated and there were a fair amount of large, open crevasses that we had to maneuver. The melt also required that we remove our crampons halfway down to hike down a rocky section. Be aware that in late-season conditions ice is still present under the rocks and mud and can be hazardous.
We traveled down the last part of the Suiattle Glacier to the base of a Glacier Gap Peak. Here, we stopped for lunch and water. After hiking to the top, we descended into the Glacier Gap Basin.
From here on out, the trail is pretty clear and easy to follow. There were a few times within the old White Chuck Basin that it disappeared into boulder fields, but it was always easy to find again. There was also one stream crossing that required us to take off our shoes and wade to the other side. If anything, it was a cool break for our exhausted feet.

From the Glacier Gap bivies, it was about four miles to White Pass. After Marmot Knob, the trail follows a mellow hillside with a few places to stop and filter water. After White Pass, we were back on the PCT for only about a half of a mile before meeting back up with the North Sauk Trail. Then, it was just rinse and repeat; just under nine miles from the top of the switchbacks to the trailhead. While the last five miles after the Mackinaw Shelter consisted of the soft, flat trail we’d started on, our feet were sore and weak. We eventually reached the car by just before 10 pm.

Summary:
Frostbite Ridge is a difficult yet rewarding route to summit Glacier Peak. It consists of variable terrain including mellow trail hiking, loose rock and dust scrambles, exposed glacier travel, and ice climbing. If climbing it in the late season, prepare for significant glacier melt and emphasize glacier safety. Overall, it’s a challenge that seasoned mountaineers should welcome! It offers some of the most scenic and diverse views in the state, and you’re not likely to see another party out there, even if you go on the weekend.